Introduction to Kubernetes
Resources
What is Kubernetes?
Kubernetes is an open source container orchestration tool. It helps you manage containerized applications in different deployment environments. Kubernetes guarantees high availability, scalability, and disaster-recovery.
Kubernetes components
Kubernetes has a lot of components, but most of the time we only need a handful of them.
Node
It’s a simple server. Can be a physical or virtual machine.
Pod
It’s the smallest unit in Kubernetes. It’s an abstraction over a container. Usually a Pod runs one container, although it’s possible to run multiple containers on the same pod. To communicate pods, Kubernetes offers a virtual network. Each pod (NOT container) gets its own IP address. Pods are ephemeral, they can also die easily.
When that happens a new pod is created to replace the old one, and it gets assigned a new IP address. This is why a Service component is used
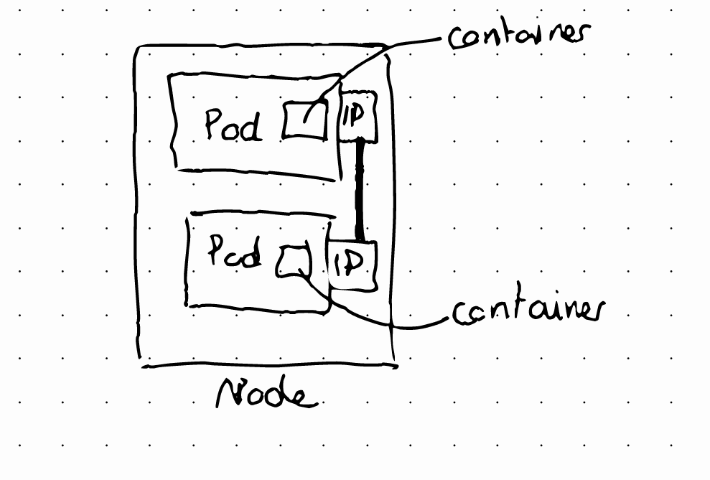
Service
A Service is a static (or permanent) IP address that can be attached to each pod. The lifecycle of a Pod and a Service are independent.
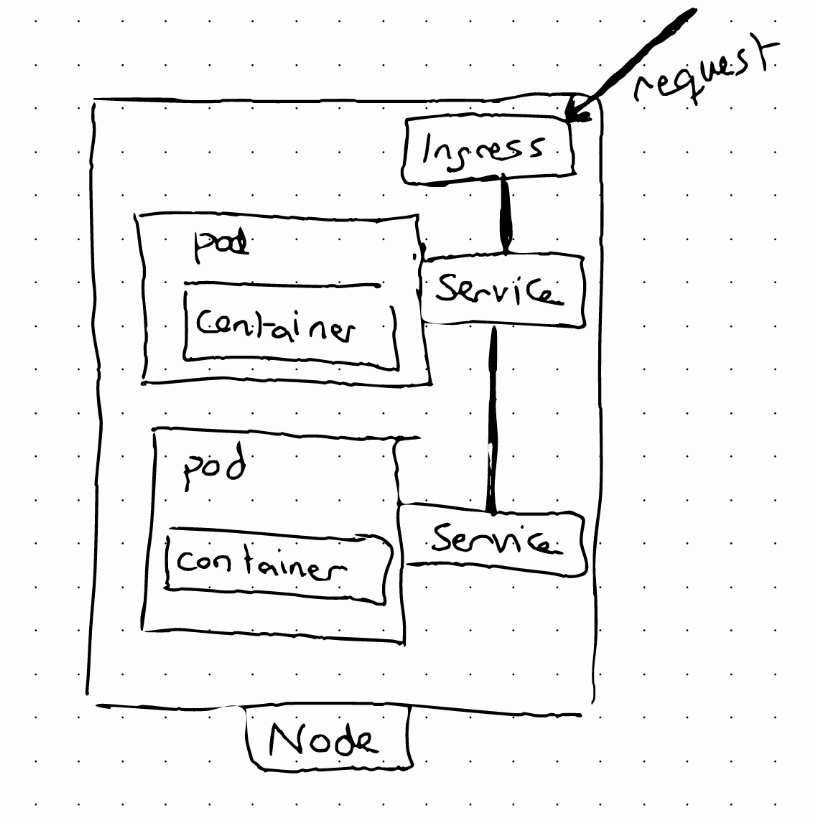
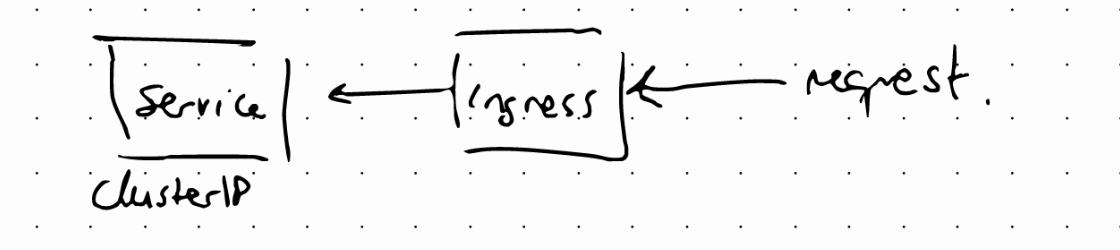
We might want our application to be accessible through a web browser. For that, we need an external service, but we would need to access our own application as http://ip:port, which is not very user friendly. To solve this problem we can use another component: Ingress
Ingress
A request goes first to Ingress and it does the forwarding to the Service.
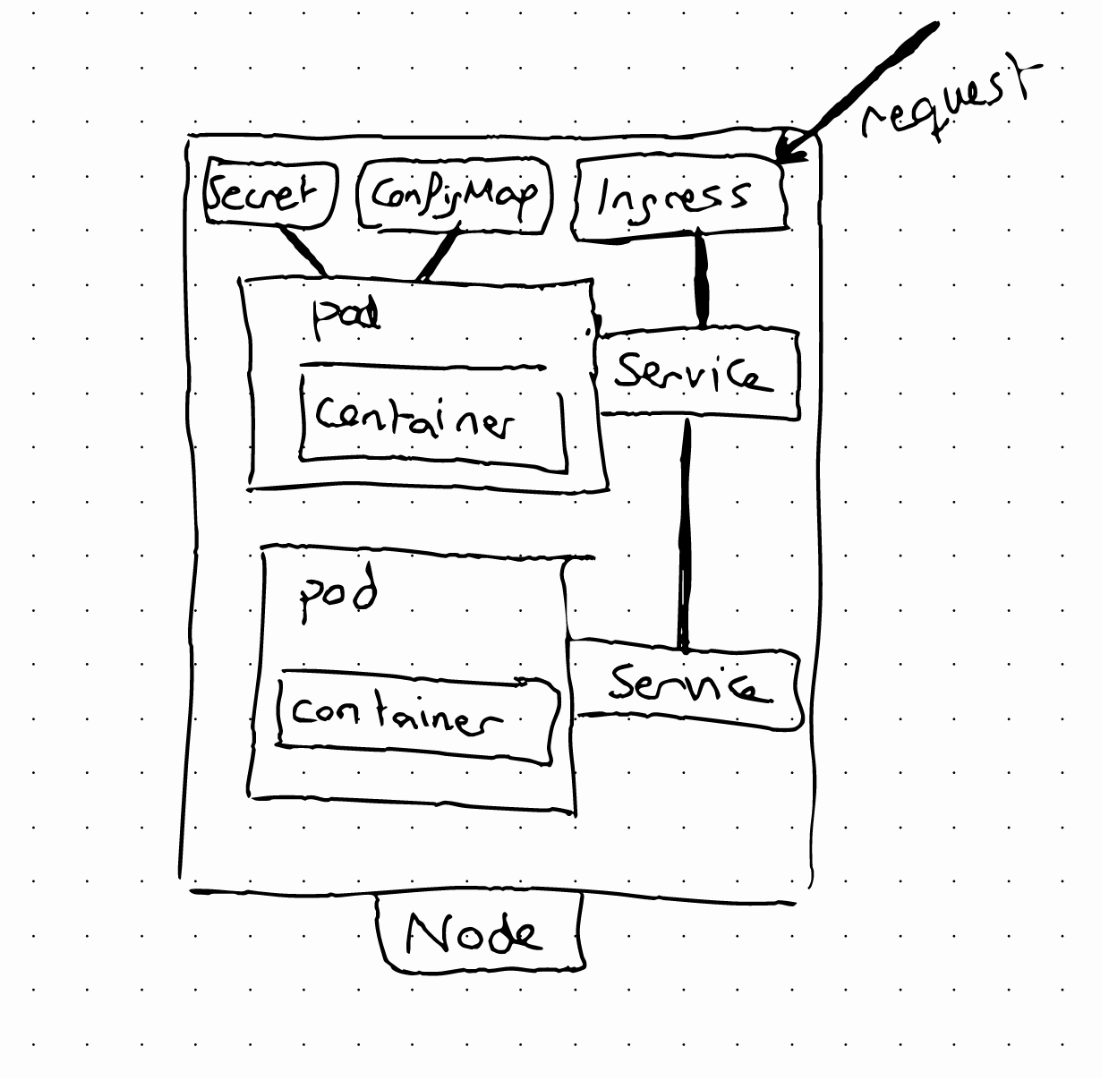
ConfigMap
A ConfigMap is the external configuration of your application. Pods can read the configuration from ConfigMaps.
Some parts of the configuration can be usernames, or passwords, but putting credentials into ConfigMaps is not recommended. For this, we can use another component called Secret.
Secret
A secret is a ConfigMap used to store secret data in Base64
Volumes
With the previously described setup, if the database pod is restarted, we will lose data. Volumes attach a physical storage to the pod. That storage can be local or remote.
Deployment
If our application pod crashes our application will experience some downtime. To avoid that, we can replicate our setup across different servers.
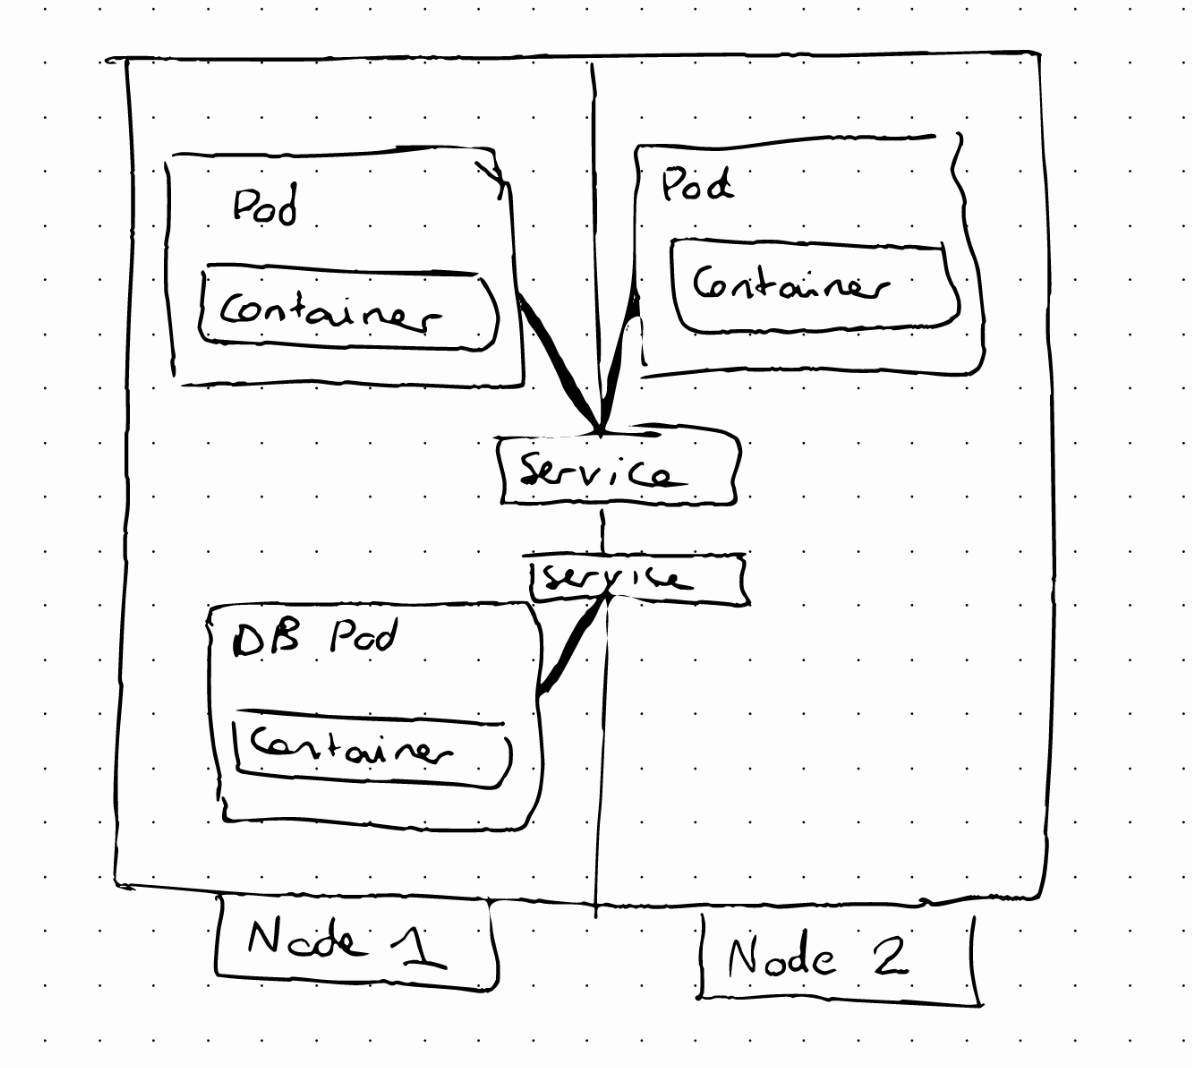
In this case, the Service will act as a load balancer, sending the request to the pod that is less busy. To define this setup we will use the Deployment component, in which we can specify the number of replicas. In practice, we will mostly work with deployments and not with Pods.
StatefulSet
It’s important to note that we can’t replicate a database using a Deployment. This is because a database has a state. If we have database replicas, all of them should access the same, shared data storage.
We will need some mechanism to manage writes and reads to avoid data inconsistencies.
This mechanism is offered by the StatefulSet component. THis component is meant specifically for applications like databases
Kubernetes Architecture
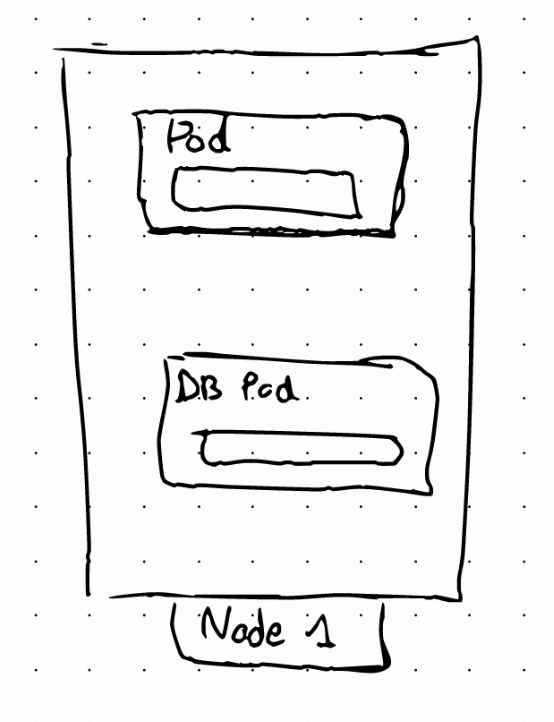
Let’s start with a setup of one node with two application pods running on it. Each node has multiple pods on it. There are 3 processes that must be installed on every node:
- Container Runtime
- Kubelet: interacts with both the container and the node
- Kubeproxy: responsible for forwarding requests from services to pods
Master nodes
How do we interact with the cluster?
How to:
- Schedule a pod?
- Monitor?
- reschedule/restart pod?
- Join a new node?
All of this is done by master nodes. Master nodes have completely different processes running inside:
- API Server: it’s the cluster gateway. It also acts as a gatekeeper for authentication.

- Scheduler: Schedules new pods. It schedules pods in a smart way depending on the available resources. THe scheduler only decides where to schedule the new pod. The kubelet is in charge of starting this new pod.
- Controller manager: detects state changes, such as pods crashing
- etcd: key-value store of the cluster state. It’s the “cluster brain”
Add a new master/node server
- Get a new server
- Install all the master/worker node processes
- Add it to the cluster
Minikube and kubectl
Minikube allows us to create a kubernetes cluster in our local machine.
Kubectl is a command line tool that allows us to interact with the cluster
Commands
Create deployment
kubectl create deployment [name]
Edit deployment
kubectl edit deployment [name]
Delete deployment
kubectl delete deployment [name]
Status of kubernetes components
kubectl get nodes|pods|services|replicaset|deployment
Debugging pods
Logs
kubectl logs [pod name]
Terminal
kubectl exec -it [pod name] -- /bin/bash
Use config file
Apply a config
kubectl apply -f [file]
Delete a config:
kubectl delete -f [file]
YAML configuration file
Every configuration file in kubernetes has 3 parts:
- Metadata: This part contains information such as the name
- Specification: Each component config file will have a specification to declare the configuration that we want to apply to the component. The attributes in the specification are specific to the
kindof the component - Status: This part is automatically created by Kubernetes. If the actual state and the desired state don’t match, kubernetes will try to fix it. The status data comes from etcd
Layers of Abstraction
Deployment manages a …
ReplicaSet manages a …
Pod is an abstraction of …
Container
Inside the specification there’s a template field that contains its own metadata and spec section. This is a blueprint for a pod where the name and the image are specified, among other things.
Connecting Components
The way the connection is established is using labels and selectors. The metadata part contains labels and the spec contains selectors. In the metadata we give components a key-value pair. Pods get the label through the template blueprint. This label is matched by the selector.
Deployments have their own label. In the specification of a service we define a selector that makes a connection between the service and the deployment or its pods.
Ports are also needed to be configured in the service and pod
Ports in Services and Pods
A service has a port where it is accessible.
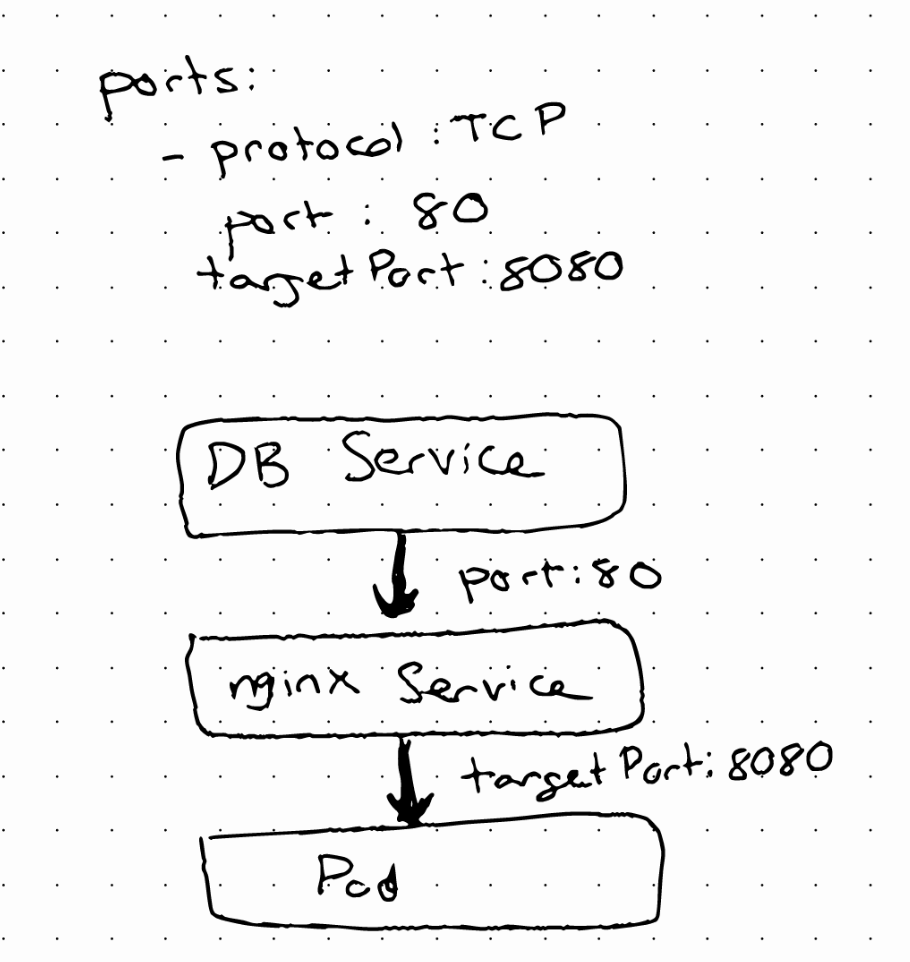
targetPort should match containerPort
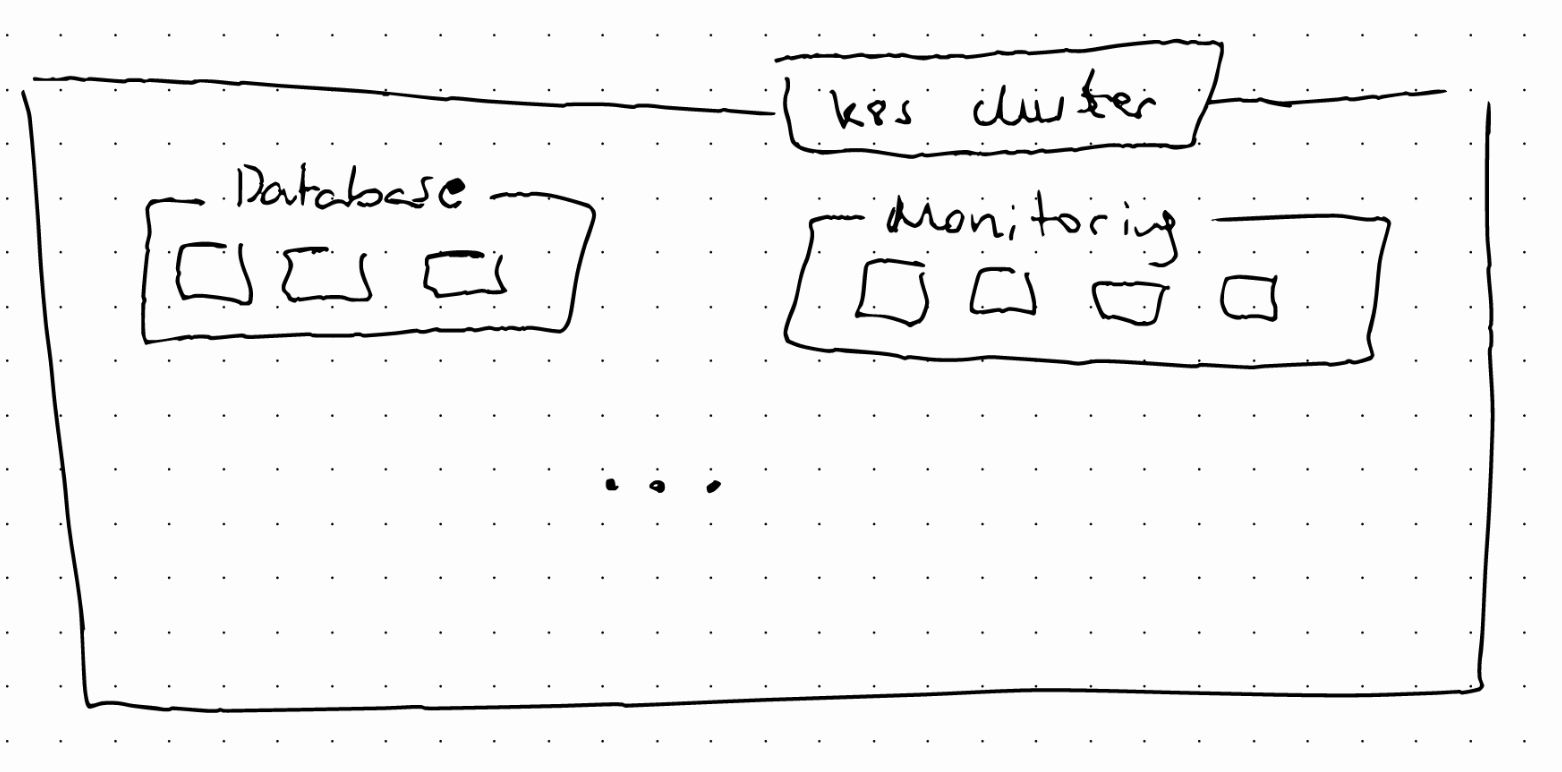
Kubernetes Namespaces
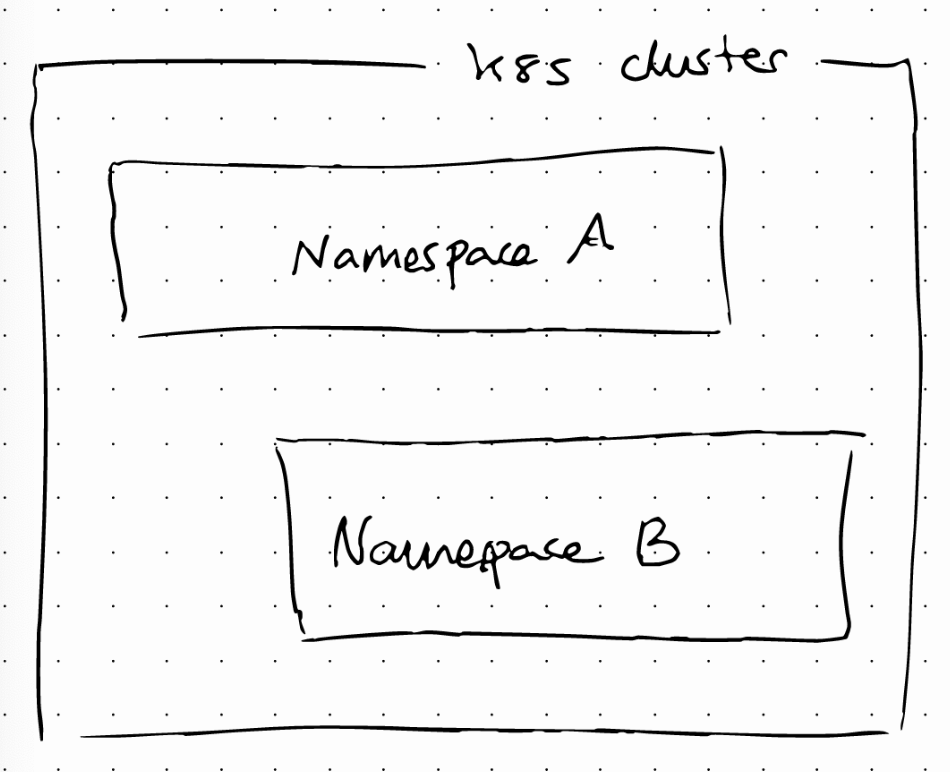
Resources can be organized in namespaces. We can think of a namespace as a virtual cluster inside a cluster. Kubernetes creates 4 namespaces by default. kubectl get namespaces returns the list of namespaces:
- kubernetes-dashboard: only with minikube
- kube-system: not designed for our use, therefore we should not modify it.
- kube-public: contains publicly accessible data
- kube-node-lease: information about heartbeats of nodes. It determines availability of nodes.
- default: resources we create are located here
We can create our own namespaces: kubectl create namespace NAME
We can also create namespaces with a namespace config file. But when should we use namespaces? Imagine you only have the default namespace, where we create all the resources. If we have a complex application with multiple deployments, replicasets, services, etc. Our default namespace is going to be filled with different components. This will make it difficult to have an overview of what’s in there.
Namespaces can be used to group resources that are related.
Namespaces can also be used to limit access or resources. There are several characteristics of namespaces:
- You can’t access most resources from another namespace: For instance, each namespace must define its own ConfigMap
- A Service can be shared across namespaces
- Some components can’t be created within a namespace: they live globally in the cluster. Some examples are volumes. To list them we can use kubectl api-resources –namespaced=false
To create components in a namespace we can use the kubectl apply command with the --namespace flag.
Another way is to add the information inside the configuration file, in the metadata section
Kubernetes Ingress
Let’s imagine a simple kubernetes cluster with an app and a service
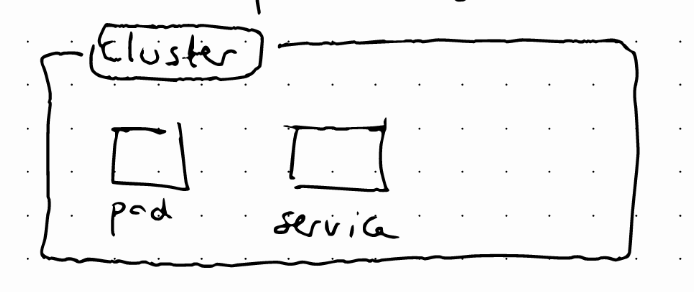
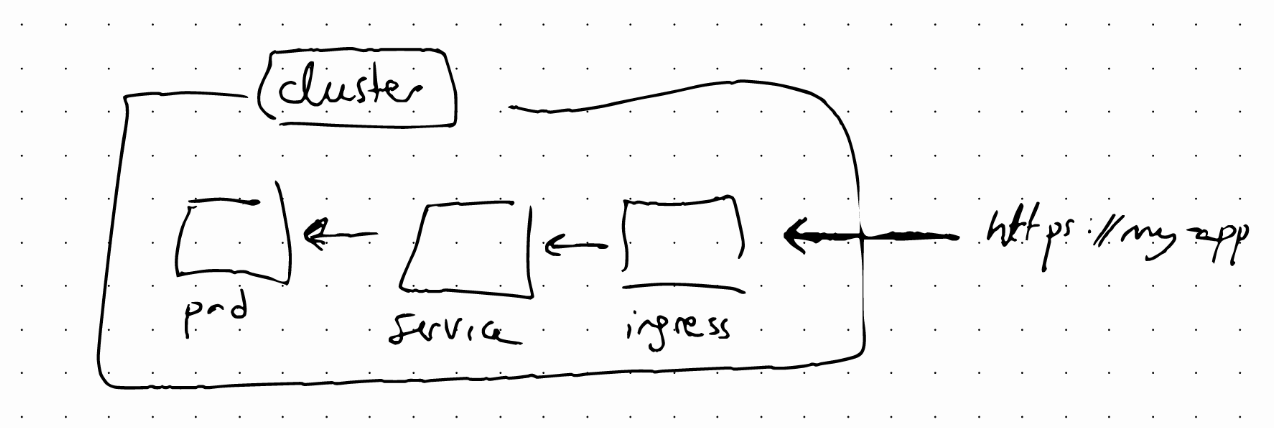
We want to be able to access the application from a web browser. One way to do this is through a externa; service using an IP address and the port. With Ingress we can access our app using a domain name.
The request will now first reach the Ingress, and Ingress will redirect it to the internal service.
Ingress components are defined on a YAML file using the kind: ingress attribute. In the spec we have routing rules, where we define the service to route the request.
In the Ingress configuration, backend is the target where the incoming request will be redirected. serviceName should correspond to the internal service name defined in the Service configuration. servicePort and port should also match. The only difference between this internal service and an external one is that for the internal service we don’t need to define the nodePort attribute.
Configure Ingress
Creating the Ingress component alone won’t be enough for ingress’ routing rules to work. We need an implementation for ingress, called Ingress Controller.
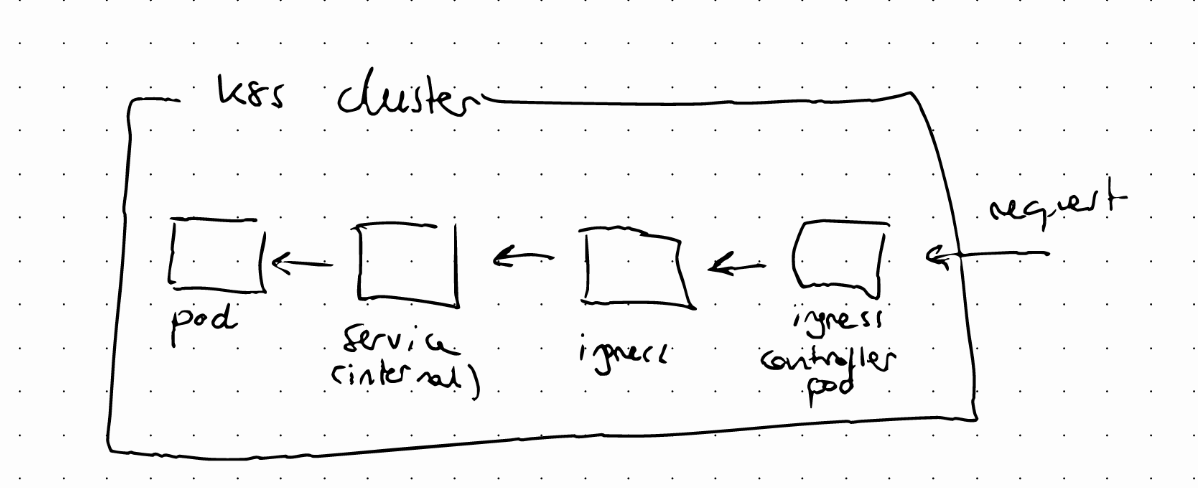
The Ingress controlled pod does evaluation and processing of ingress rules, and also manages redirections. This is the entry point to the cluster. There are several implementations available.
If we use a cloud provider (Google Cloud, AWS, etc), they usually provide a cloud load balancer solution. On the other hand if we are deploying our own kubernetes cluster on a bare metal environment, we would have to do that part.
Kubernetes Volumes
Volumes are used to persist data in kubernetes, as kubernetes doesn’t give us data persistence out of the box, and therefore by default, storage depends on the pod lifecycle.
The storage must be independent of the pod lifecycle, and also available on all nodes, as we don’t know in which node our pod will be restarted. Storage also needs to survive even if the cluster crashes.
Persistent Volume
A persistent volume is a cluster resource (like RAM or CPU) that is used to store data. It is created via a YAML file, with the PersistentVolume kind.
A persistent volume acts as an interface but we still need to create and manage the type of storage. Persistent values are NOT namespaced. This means that they are accessible to the whole cluster.

Local vs remote volume types
Local volume types are tied to a specific node, and don’t survive to cluster crashes. For DB persistence, we should use remote volumes.
Persistent Volume Claim Component
Applications have to claim the Persistent Volume. We do that using the Persistent Volume Claim (PVC). The PVC claims a volume with certain characteristics. The Persistent Volume that satisfies the claim will be used. In the app Pod specification we need to reference the PVC.
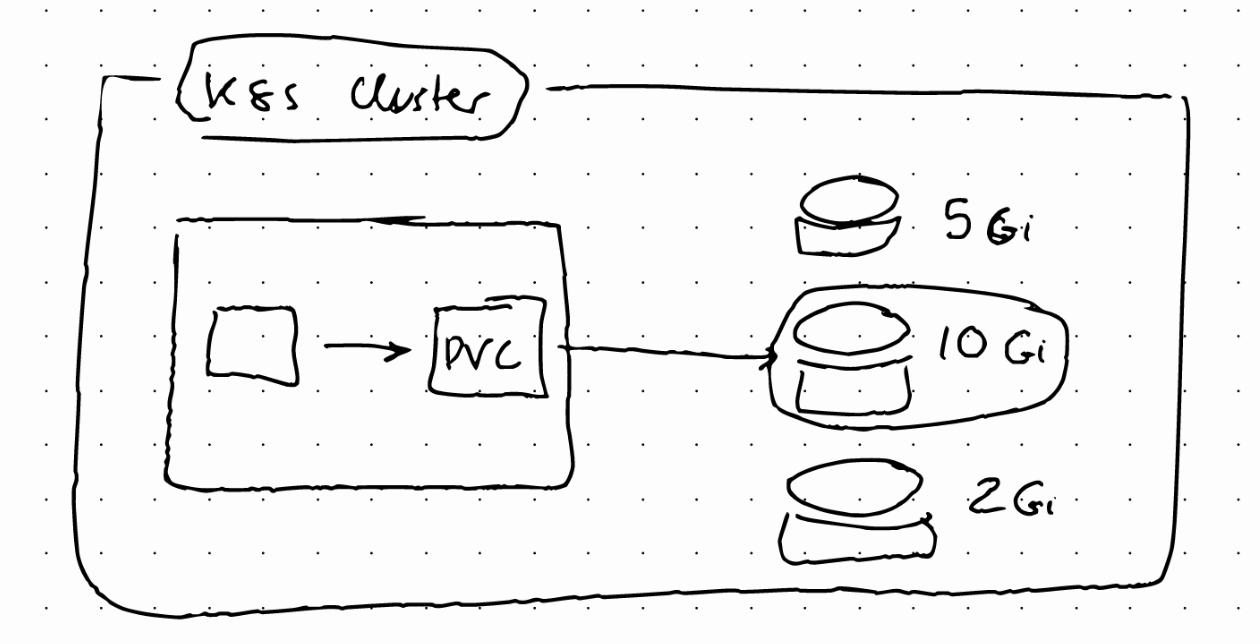
Note here that claims must exist in the same namespace as the Pod using the claim.
ConfigMap and Secret
ConfigMaps and Secrets are local volumes that are not created using Persistent Volumes and PVCs.
Storage Class
Storage Class provisions Persistent Volumes dynamically when PVC claims it. It can be created with a YAML config file using the StorageClass kind.
- Pod claims storage via PVC
- PVC request storage from Storage Class (SC)
- SC creates Persistent Volume that meets the needs of the Claim
Kubernetes StatefulSet
A StatefulSet is a kubernetes component used to stateful applications, this is, applications that store data to keep track of their state.
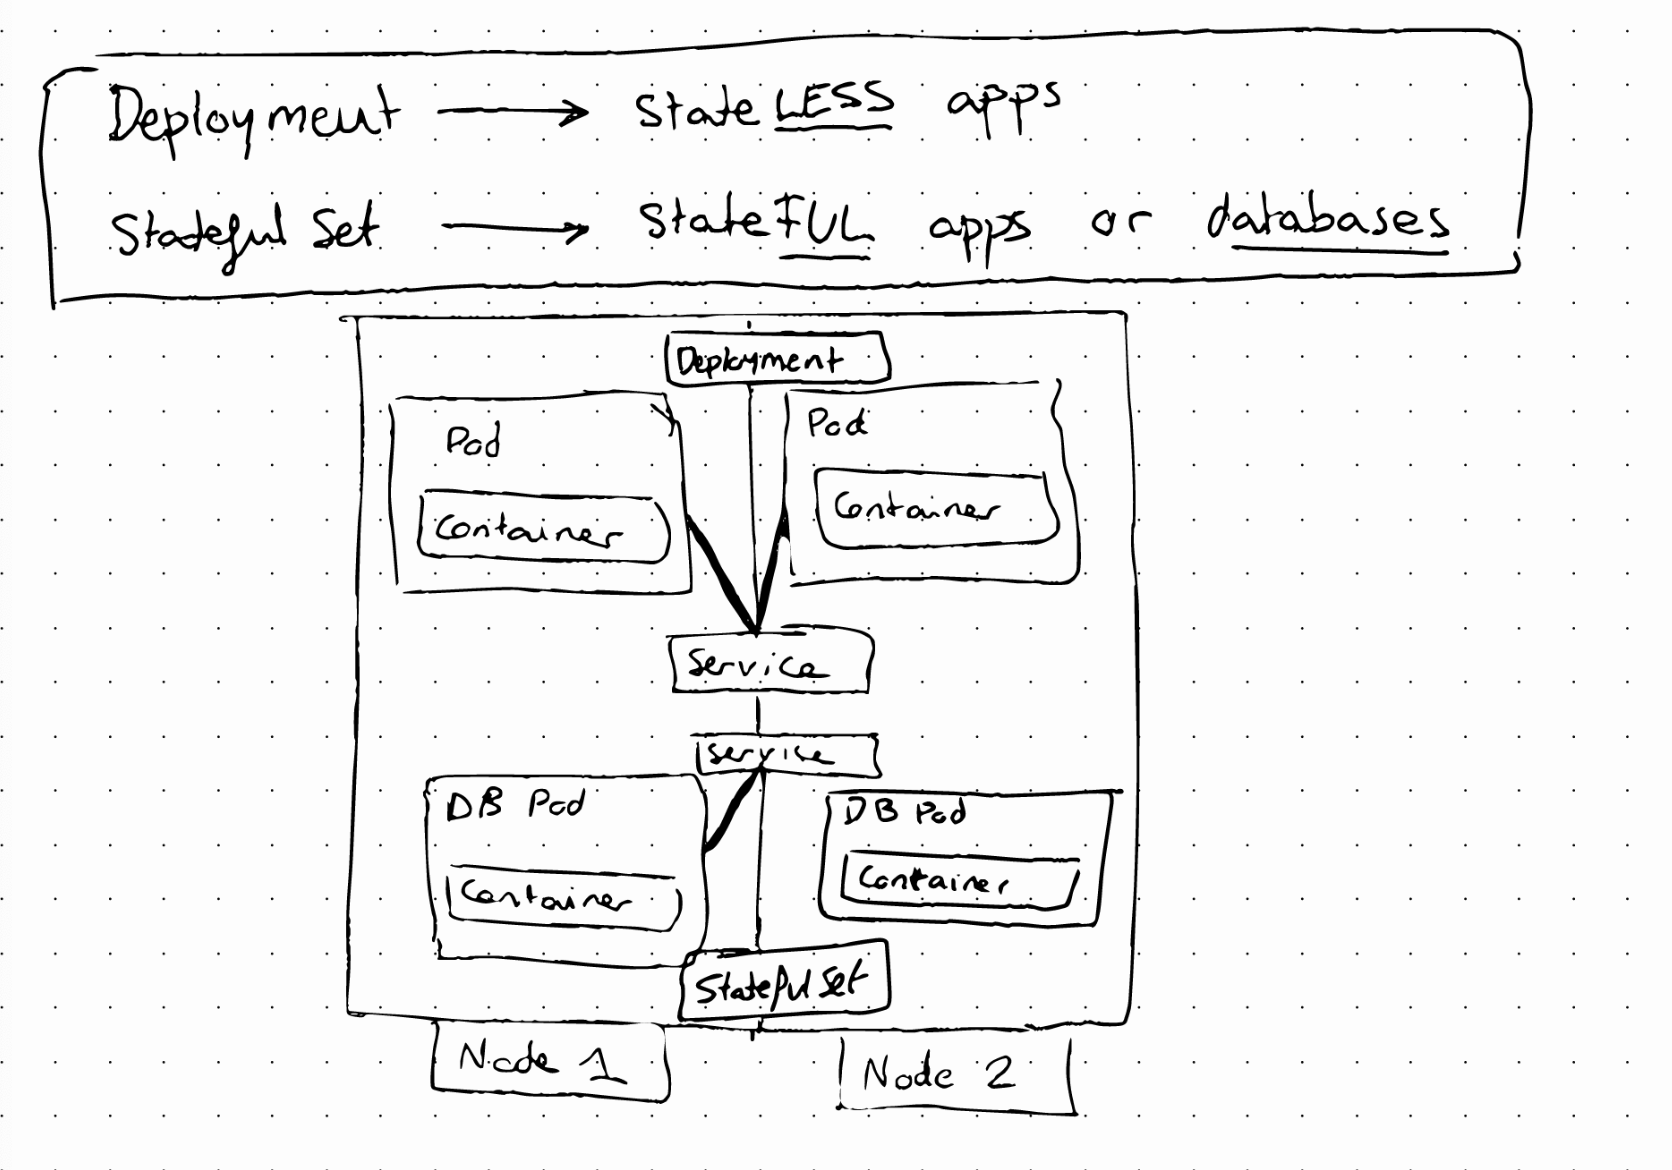
StateLESS applications are deployed using Deployment
StateFUL applications are deployed using StatefulSet
Deployment vs. StatefulSet
Replicating stateful applications is difficult and has some requirements that stateless applications don’t have. A Stateful Set maintains a “sticky” identity for each of its posd. These pods are created from the same specification but are not interchangeable. Each one has a persistent ID that is maintained across re-scheduling.
The pods are not interchangeable because one of them will act as the main writer and the rest as the read replicas. In addition, each pod in a statefulset gets its own DNS endpoint from a Service. When a Pod in a StatefulSet restarts, its IP address will change but its name and endpoint stays the same.
There are some tasks that we need to do:
- Configuring the cloning and data synchronization
- Make remote storage available
- Managing and backup
Kubernetes Services
As we explained before, Pods are ephemeral and when one dies and is rescheduled, it gets assigned a new IP address. Therefore, it doesn’t make sense to use Pod’s IP addresses directly. A Service solves this problem by representing a stable IP address. It also acts as a load balancer. There are several types of services in kubernetes.
ClusterIP Service (AKA Internal Service)
Probably the most common one. It’s the default type of a Service.
But how does a Service know which Pods to forward the request to? And which port?
A service identifies its member pods using selectors. In the YAML file from which we create the service we specify the selector attributes that pods should have to match that selector. To know the right port, we need to specify it in the targetPort attribute in the Service YAML file
Headless Service
Imagine if a client wants to communicate with a specific Pod directly, or a Pod wants to talk to another pod directly. It won’t make sense to talk to the Service endpoint because it will randomly select one of the pods. This happens when we deploy stateful applications, because the Pod replicas are not identical.
If we set clusterIP to none in the Service specification, kubernetes will return the Pod IP instead.
Service Types
When we define a Service we can specify a type. This attribute accepts three different values:
- ClusterIP
- NodePort
- LoadBalancer
NodePort
Creates a Service that is accessible on a static port on each worker node in the cluster. To compare that to clusterIP, clusterIP services are only accessible within the cluster itself, so no external traffic can directly address the clusterIP service.
NodePort, however, makes external traffic accessible on a static port on each worker node.
LoadBalancer
A service becomes accessible externally through a cloud provider’s load balancing functionality.